

How to Invite New Players to Sunbears
Learn how to invite new players
Efficient team management begins with getting everyone on board. With Sunbears, inviting new members to your team is a seamless process. Follow these simple steps to ensure your players and staff are set up and ready to contribute to your team's success.
Step 1: Access User Management
Navigate to the left panel and click on Users under Security & Settings.
Step 2: Send an Invitation
Click on INVITE USER.
Fill in the necessary information for the user you wish to invite.
Step 3: Specify User Role
Choose the user type:
Staff
Player
Step 4: Assign Staff Roles
If the user is a staff member, select their role:
Administrator
Coach
Drill Coach
Recorder
Use the Staff for Assign tab to assign the appropriate role to the user.
Step 5: Send the Invitation
Click on the Send button to dispatch the invitation.
Step 6: User Receives Invitation
The new user will receive an invitation link via email.
If they are new to Sunbears, they will be prompted to create a new account.
Step 7: Account Creation and Verification
The new user fills out the registration form and verifies their account through the email link.
Step 8: Join the Team
By clicking on Accept, the new user will become part of your team on Sunbears.
Additional Tips
Ensure all user information is accurate before sending the invitation to avoid any delays.
Encourage new users to complete their profiles for a more personalized experience.
Regularly update your team's user list to reflect current members and their roles.
With these steps, inviting new players and staff to Sunbears is straightforward and efficient. Keep your team organized and connected, so you can focus on what truly matters—performance and strategy.
For further assistance or if you have any questions, don't hesitate to reach out to us. Stay connected and keep your team on the winning path with Sunbears!

How to Schedule Events
Learn how to schedule events
In the fast-paced world of sports, efficient scheduling is key. It ensures that your team is always prepared and that no detail slips through the cracks. With the scheduling feature of Sunbears, you can streamline your planning process, keep everyone informed, and focus on what really matters – performance and strategy.
Schedule an Event
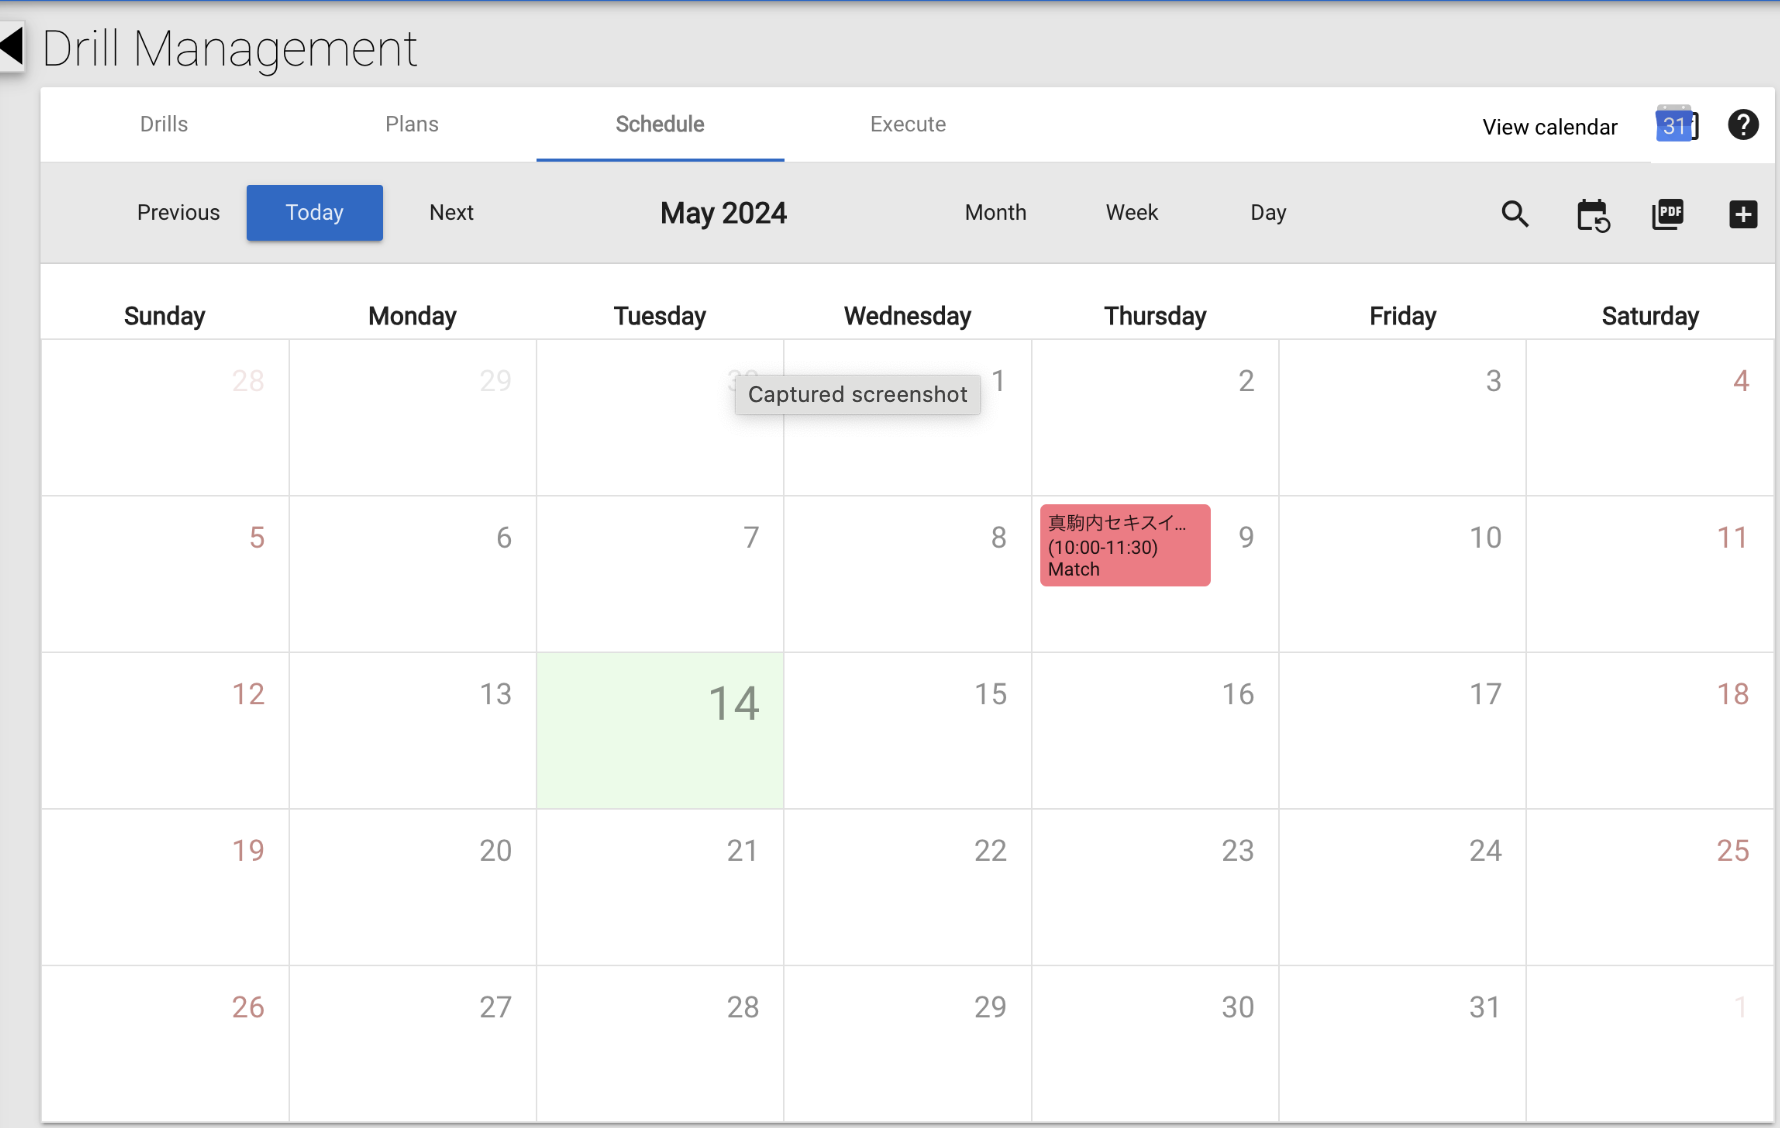
To schedule a new event, first click on the Schedule under Drill Management on the left panel. This will lead you the default view of the schedule which is the current month with the current date highlighted in green.
To add a new event, click on the date that the event occurs, or the + button at the top right of the page.

This leads to a schedule creation pop-up page like the one below. Add in just the required information* (the location of the event and start time) to save the event in your calendar in just a few seconds.
Other features include :
Name & Duration: Name and duration of the event can be added here.
Activity Type: Select between different activities like match, strength & conditioning, skill etc. For easy recognition, different types of activities are color coded with different colors.
Key Points: Any notes about the event that needs to be conveyed to the team can be written here.
Add Players: Players who are expected to attend the event can be added here. The event will then show up on the players’ calendar.
Notify My Team: Click the checkbox at the top of the pop-up window to trigger a notification on your team member’s accounts every time an event is created or edited.
Players Attendance: The toggle at the bottom indicates whether players are set to attend by default. If it’s enabled (blue), it means all team players are automatically considered as attending. If you need to manually select attendees, disable this option, and you will be able to select players individually.
Premium Features: * 1. For teams with the Drill Creation or All-in-One packages*
A. Plan: Choose from any of the saved plans that you’ve previously set up for training or practice sessions.
B. Invite squad, all players, etc.: Simply click the checkbox to invite all members. This ensures that your entire squad is informed about the session.
C. Planned sRPE: Enter the expected sRPE (Session: Rate of Perceived Exertion) value of the event if needed.
2. For teams with the Team Management Advanced or All-in-One packages
D. Player Group / Player Lineup: When creating a non-match event, you can choose an existing Player Group (set under the Players menu). Creating a match event allows you to set or select a Lineup for the event.
**Other Premium Features *(*For teams with the Drill Creation or All-in-One packages)
Google Calendar Integration: This feature enables users to integrate the Sunbears calendar with their Google Calendar
Recurring Events: This feature helps you to manage regularly recurring events in your calendar.
c. Export Calendar Feature : Calendars can be exported as PDFs with this feature
d. Execute: This feature helps users manage execution of event sessions for example - using the timer, and marking them as finished etc.
Watch the Tutorial Now
Here’s an actual screen recording of creating a match event in our scheduling feature:
We hope you find this tutorial helpful and that it enhances your experience with scheduling on Sunbears. If you have any questions or need further assistance, don’t hesitate to reach us at …… .
Stay organized and keep your team ahead of the game!

Bonus : Tips on how to use our scheduling feature effectively
Tips on using the scheduling function
A.Tips for Maximizing Your Scheduling Efficiency
To help you get the most out of our scheduling tool, here are some practical tips:
Plan Ahead: Schedule your events well in advance. This gives your team ample time to prepare and ensures better participation.
Be Detailed: When creating events, provide all necessary details. This clarity helps in avoiding any misunderstandings.
Utilize Notifications: Take advantage of our notification settings to remind your team about upcoming events. Timely reminders can improve attendance and punctuality.
Keep it Updated: Regularly update your schedule to reflect any changes. This keeps everyone informed and aligned.
B.Using Saved Plans for Training/Practice Sessions (Drill Creation or All-in-One packages)
5. Recurring Events: For recurring training or practice sessions, just click on our recurring event button to set the event regularly in the calendar.
6. Select from Saved Plans: Choose from any of the saved plans that you’ve previously set up for training or practice sessions.
7. Invite Squad or All Players: Simply click the checkbox to invite all members. This ensures that your entire squad is informed about the session and can confirm their availability.
8. Personalize Training Load: When planning your team's training sessions, it's important to include the expected sRPE (Session: Rate of Perceived Exertion) value. This metric helps you gauge the intensity of the event in advance, ensuring your athletes are neither overworked nor underprepared.


C. Advanced Features for Enhanced Team Management (Team Management Advanced or All-in-One packages)
Player Group / Player Lineup Customization:
9. Non-Match Events: Easily select an existing Player Group from the Players menu when scheduling non-match events. This feature streamlines the organization of your training sessions and ensures the right players are grouped together.
10. Match Events: When setting up a match event, you can create or choose a specific Lineup. This flexibility allows for precise planning and optimal team performance.
By leveraging these features, you can enhance your team's preparation and ensure each session is tailored to your specific requirements.

Playback App: Your Ultimate Guide to Recording Matches
Learn how to use the playback app to record your match!
Keeping track of every play and player performance is crucial in team sports. With the Sunbears Playback App, coaches can efficiently record and analyze match events. Here’s how to make the most of this powerful tool.
First of All: On Sunbears Website
Step 1: Before Scheduling a Match
Register Team Information:
Register players and opposing teams
Register stadiums and any desired event types
Assign Recorder Role and Set Up Swipe-Actions
Decide who will be the recorder and apply user account settings
Set up swipe-actions for recorder:
Swipe actions are presets that could be set for frequently used events to allow easy recording of actions during game play.
5 events can be set up for swipe-actions for the following gestures:
up-flick
right-flick
down-flick
left-flick
tap
Step 2: Scheduling a Match
Create a New Match: create a new match & fill in required information
Next Step: On the Sunbears Playback App
Step 1: Select Your Match
Login to the Playback App: Use your credentials to access the app.
Choose Your Match: Select the match you want to record from the list.
Useful Tip: Navigating the Main Menu
Main Menu Options:
Sidebar: Access app info or log out.
Change Team: Switch between teams.
Match Status: Check the status of ongoing matches.
Statistics: View match and player statistics.
User & Team: Manage user and team settings.
Open Match: Start a new match recording.
Step 2: Adjust Your Lineup
Set Players and Reserves: Adjust the players and reserves for the match.
players can be dragged and dropped into the lineup list to adjust player lineup
Proceed to Play: Ensure everything is set and proceed to the play screen by clicking “proceed to venue”.
Step 3: Start Recording
You can record events that occur during the match.
Recording Events:
Swipe-Action Settings: Recorder can set up swipe actions on the Sunbears website
Manual Input: Recorder can manually type in events during a match.
Recording Player Swaps:
Individual Swap: Tap on player to swap out, and replace from the list.
Lineup Swap: double tap on the right-hand line numbers
*Remember to hit the pause/play button after every event to start recording the match again
Tips: Navigating the Match Screen
Rink: Recordable Field
Players on Field
Player Lineup
Right Side Icons:
Stop Period
Save Action
Cancel Action
Event Playback
Statistics
Swipe Actions
Play/Pause
Period
View/Edit Events
Step 4: Ending a Match
Automatic End: The recording ends automatically after the final period.
Make Any Modifications as Necessary: Click on “Events” tab on the left to add/edit any events.
Review Statistics: Check who scored, player performance, and on-field time.
Finalize Data: After reviewing, press the red end button to finalize match data.
Additional Tips
Ensure Preparation: Confirm recorder settings and check tablet operations before the match.
Sync Information: If connection is lost, the app will sync data once reconnected.
No Overtime Recording: Currently, overtime events are not recorded.
Conclusion:
Using the Sunbears Playback App makes it easy to capture every critical moment of your matches, providing valuable insights and data for team performance analysis.
For further assistance or any questions, feel free to reach out to us at [Contact Information]. Enhance your match recording experience with Sunbears!